If you’ve discovered pigeons nesting under your solar panels, you’re probably wondering what happens next.
How does professional bird proofing actually work?
How long does it take?
Will the mesh look ugly on the roof?
And how do you know you’re hiring the right company?
These are some of the most common questions homeowners ask before booking a bird proofing service.
The good news is that professional bird proofing is usually a straightforward process when done properly. Most residential installations can be completed in a matter of hours, and the results are often much neater than homeowners expect.
In this guide, we’ll walk you through exactly what to expect when hiring a professional bird proofing company in Melbourne.
Why Professional Bird Proofing Matters
Many homeowners initially try to solve pigeon problems themselves.
Over the years we’ve seen people attempt all sorts of DIY solutions, including:
- Bird spikes
- Plastic mesh
- Reflective discs
- Rubber snakes
- Sonic deterrents
- Homemade barriers
Unfortunately, most of these solutions fail because they don’t address the real problem.
Pigeons aren’t simply landing on the roof.
They’re nesting underneath the solar panels.
The most effective long-term solution is preventing access to that space altogether.
That’s where professional solar panel bird proofing comes in.
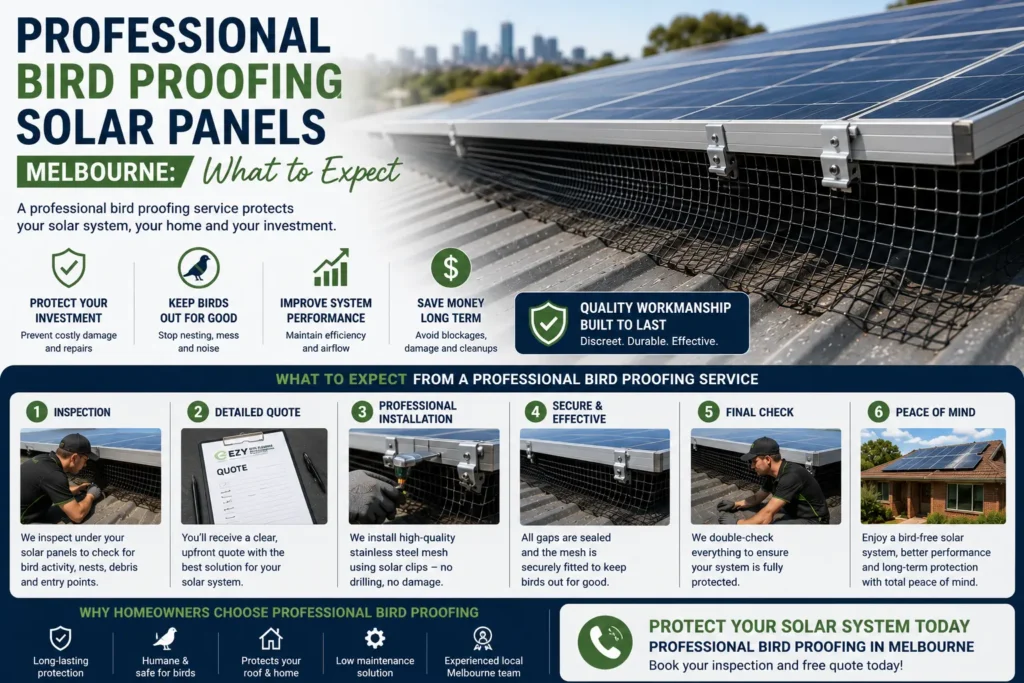
Step 1: The Initial Consultation
The process usually starts with a conversation.
When a homeowner contacts us, we first try to understand what’s happening.
Some of the questions we typically ask include:
- Is this a new solar system?
- Are there currently pigeons nesting underneath?
- How long has the problem been going on?
- Have you noticed noise, droppings or nesting activity?
- Have you tried any previous solutions?
The goal is to determine whether we’re dealing with:
- A preventative installation
- A small developing problem
- An established infestation
This helps us recommend the most appropriate solution.
Step 2: Assessing the Solar System
Once we understand the situation, we review the solar system itself.
Using aerial imagery and roof layouts, we assess:
- The size of the solar array
- The number of panel groups
- Roof access
- The amount of perimeter requiring protection
This allows us to calculate the materials required and prepare an accurate quote.
As we’ve discussed in our article on How Much Does Solar Panel Bird Proofing Cost in Melbourne?, bird proofing is generally priced according to the amount of perimeter that needs protection rather than simply the number of panels.
Step 3: Receiving a Quote
Once the assessment is complete, a quote can be prepared.
Depending on the situation, this may include:
- Bird proofing installation
- Nest removal
- Debris removal
- Cleanup underneath the panels
- Optional solar panel cleaning
Every property is different, so the scope of work depends on the condition of the solar system and whether birds have already moved in.
Step 4: Arriving on Site
On the day of the installation, the first step is usually gaining safe access to the roof and inspecting the area underneath the solar panels.
For preventative installations, there may be very little preparation required.
For active infestations, however, there is often more work involved before the bird proofing can be installed.
This is where many homeowners get their first real look at the extent of the problem.
Step 5: Removing Nests and Debris
If birds have been nesting underneath the panels, the nesting material needs to be removed before bird proofing can be installed.
Depending on how long the infestation has been present, this can include:
- Nesting material
- Feathers
- Bird droppings
- General debris
One thing that consistently surprises homeowners is how much material can accumulate underneath the panels.
Many people assume they only have a few birds on the roof.
Then they see what’s actually underneath.
We’ve seen homeowners genuinely shocked by:
- The amount of droppings
- The volume of nesting material
- The mess inside gutters
- Dead birds hidden underneath the array
The extent of the buildup is often far greater than expected.
Step 6: Installing the Bird Proofing Mesh
Once the area has been cleaned and prepared, the bird proofing mesh is installed around the perimeter of the solar array.
The goal is simple:
Prevent birds from accessing the space underneath the panels.
When installed correctly, the mesh creates a physical barrier while still allowing airflow beneath the solar system.
This removes the sheltered nesting area that pigeons are attracted to.
As we’ve covered in How to Prevent Birds From Nesting Under Solar Panels, eliminating access is the most effective way to stop future nesting activity.
Step 7: Optional Solar Panel Cleaning
Some homeowners choose to combine bird proofing with solar panel cleaning.
This is particularly common when:
- The panels are heavily contaminated by droppings
- The infestation has been active for a long time
- The panels haven’t been cleaned recently
Cleaning the panels after bird proofing helps restore the appearance of the system and removes contamination caused by nesting activity.
How Long Does Professional Bird Proofing Take?
For most residential systems, bird proofing can typically be completed within approximately two to four hours.
The exact timeframe depends on factors such as:
- System size
- Number of solar arrays
- Severity of the infestation
- Roof access
- Whether cleaning is required
Larger systems may take longer, but most residential jobs can be completed in a single visit.
What Does the Finished Installation Look Like?
This is one of the biggest concerns homeowners have before booking.
Many people imagine a bulky or unattractive mesh structure surrounding their solar panels.
In reality, most are pleasantly surprised by the finished result.
When installed properly:
- The mesh sits neatly against the panels
- It follows the perimeter of the array
- It appears far less noticeable than expected
A common comment we hear after installation is:
“That looks much better than I thought it would.”
Most homeowners quickly realise that the bird proofing is far less noticeable than the pigeons, droppings and ongoing mess it replaces.
What Separates a Good Installation From a Bad One?
Not all bird proofing installations are equal.
Over the years we’ve seen many poorly executed jobs that eventually required replacement.
The three biggest problems we encounter are:
Cheap Mesh
Low-quality mesh may deteriorate prematurely or fail to provide long-term protection.
Incorrect Clips
Different solar systems require appropriate mounting clips.
Using the wrong clips can affect the quality and durability of the installation.
Leaving Gaps
This is one of the most common mistakes.
If gaps are left around the perimeter, corners or between sections of the array, pigeons may still be able to access the nesting area.
A quality installation should completely eliminate access points.
What Happens After Bird Proofing Is Installed?
One thing homeowners should understand is that pigeons don’t always disappear immediately.
If birds have been nesting under the panels for a long time, they often return out of habit.
This is normal.
They remember the location and may continue checking the area for a period of time.
The difference is that they can no longer get underneath the panels.
Over time, the birds move on and find alternative locations.
The end result is typically:
- No more nesting
- Less noise
- Cleaner gutters
- Cleaner solar panels
- A significant reduction in pigeon activity
For many homeowners, the biggest benefit is simply the peace and quiet that comes with finally solving the problem.
Frequently Asked Questions
How does professional solar panel bird proofing work?
Professional bird proofing uses mesh installed around the perimeter of the solar array to prevent birds from accessing the space underneath the panels.
Do bird proofing companies remove nests first?
Yes. If nesting material is present, it is typically removed before the bird proofing system is installed.
How long does bird proofing take?
Most residential bird proofing jobs are completed within approximately two to four hours, depending on the size and condition of the system.
Will bird proofing damage my solar panels?
A properly installed system should use appropriate clips and installation methods that do not require drilling into the solar panels.
Does bird proofing look ugly?
Most homeowners are surprised by how neat the finished installation looks. When installed correctly, the mesh sits closely around the perimeter of the solar array and is often difficult to notice from the ground.
What should I look for when choosing a bird proofing company?
Look for quality materials, correct installation methods, proper solar clips, good reviews, experience and a commitment to fully sealing the perimeter without leaving gaps.
Can bird proofing be installed on existing solar panels?
Yes. Most bird proofing systems are installed after the solar panels have already been installed.
Do I need solar panel cleaning as well?
Not always. However, if bird droppings have accumulated on the panels, combining bird proofing with solar panel cleaning is often a sensible option.